Measure conversion
Before you begin
Section titled “Before you begin”We’re going to use Google Tag Manager to send data to Google Analytics.
Before you begin:
This guide assumes you have some knowledge of Google Analytics and Google Tag Manager. We recommended reading:
- Introduction to Google Analytics 4
- Gtag.js (Google Analytics) vs. Google Tag Manager
- Measure ecommerce
Get started
Section titled “Get started”Track conversion with Google Analytics 4 in four steps:
Set up Google Analytics
Section titled “Set up Google Analytics”Create a property
Section titled “Create a property”From the Google Analytics dashboard, go to Admin then click Create Property.
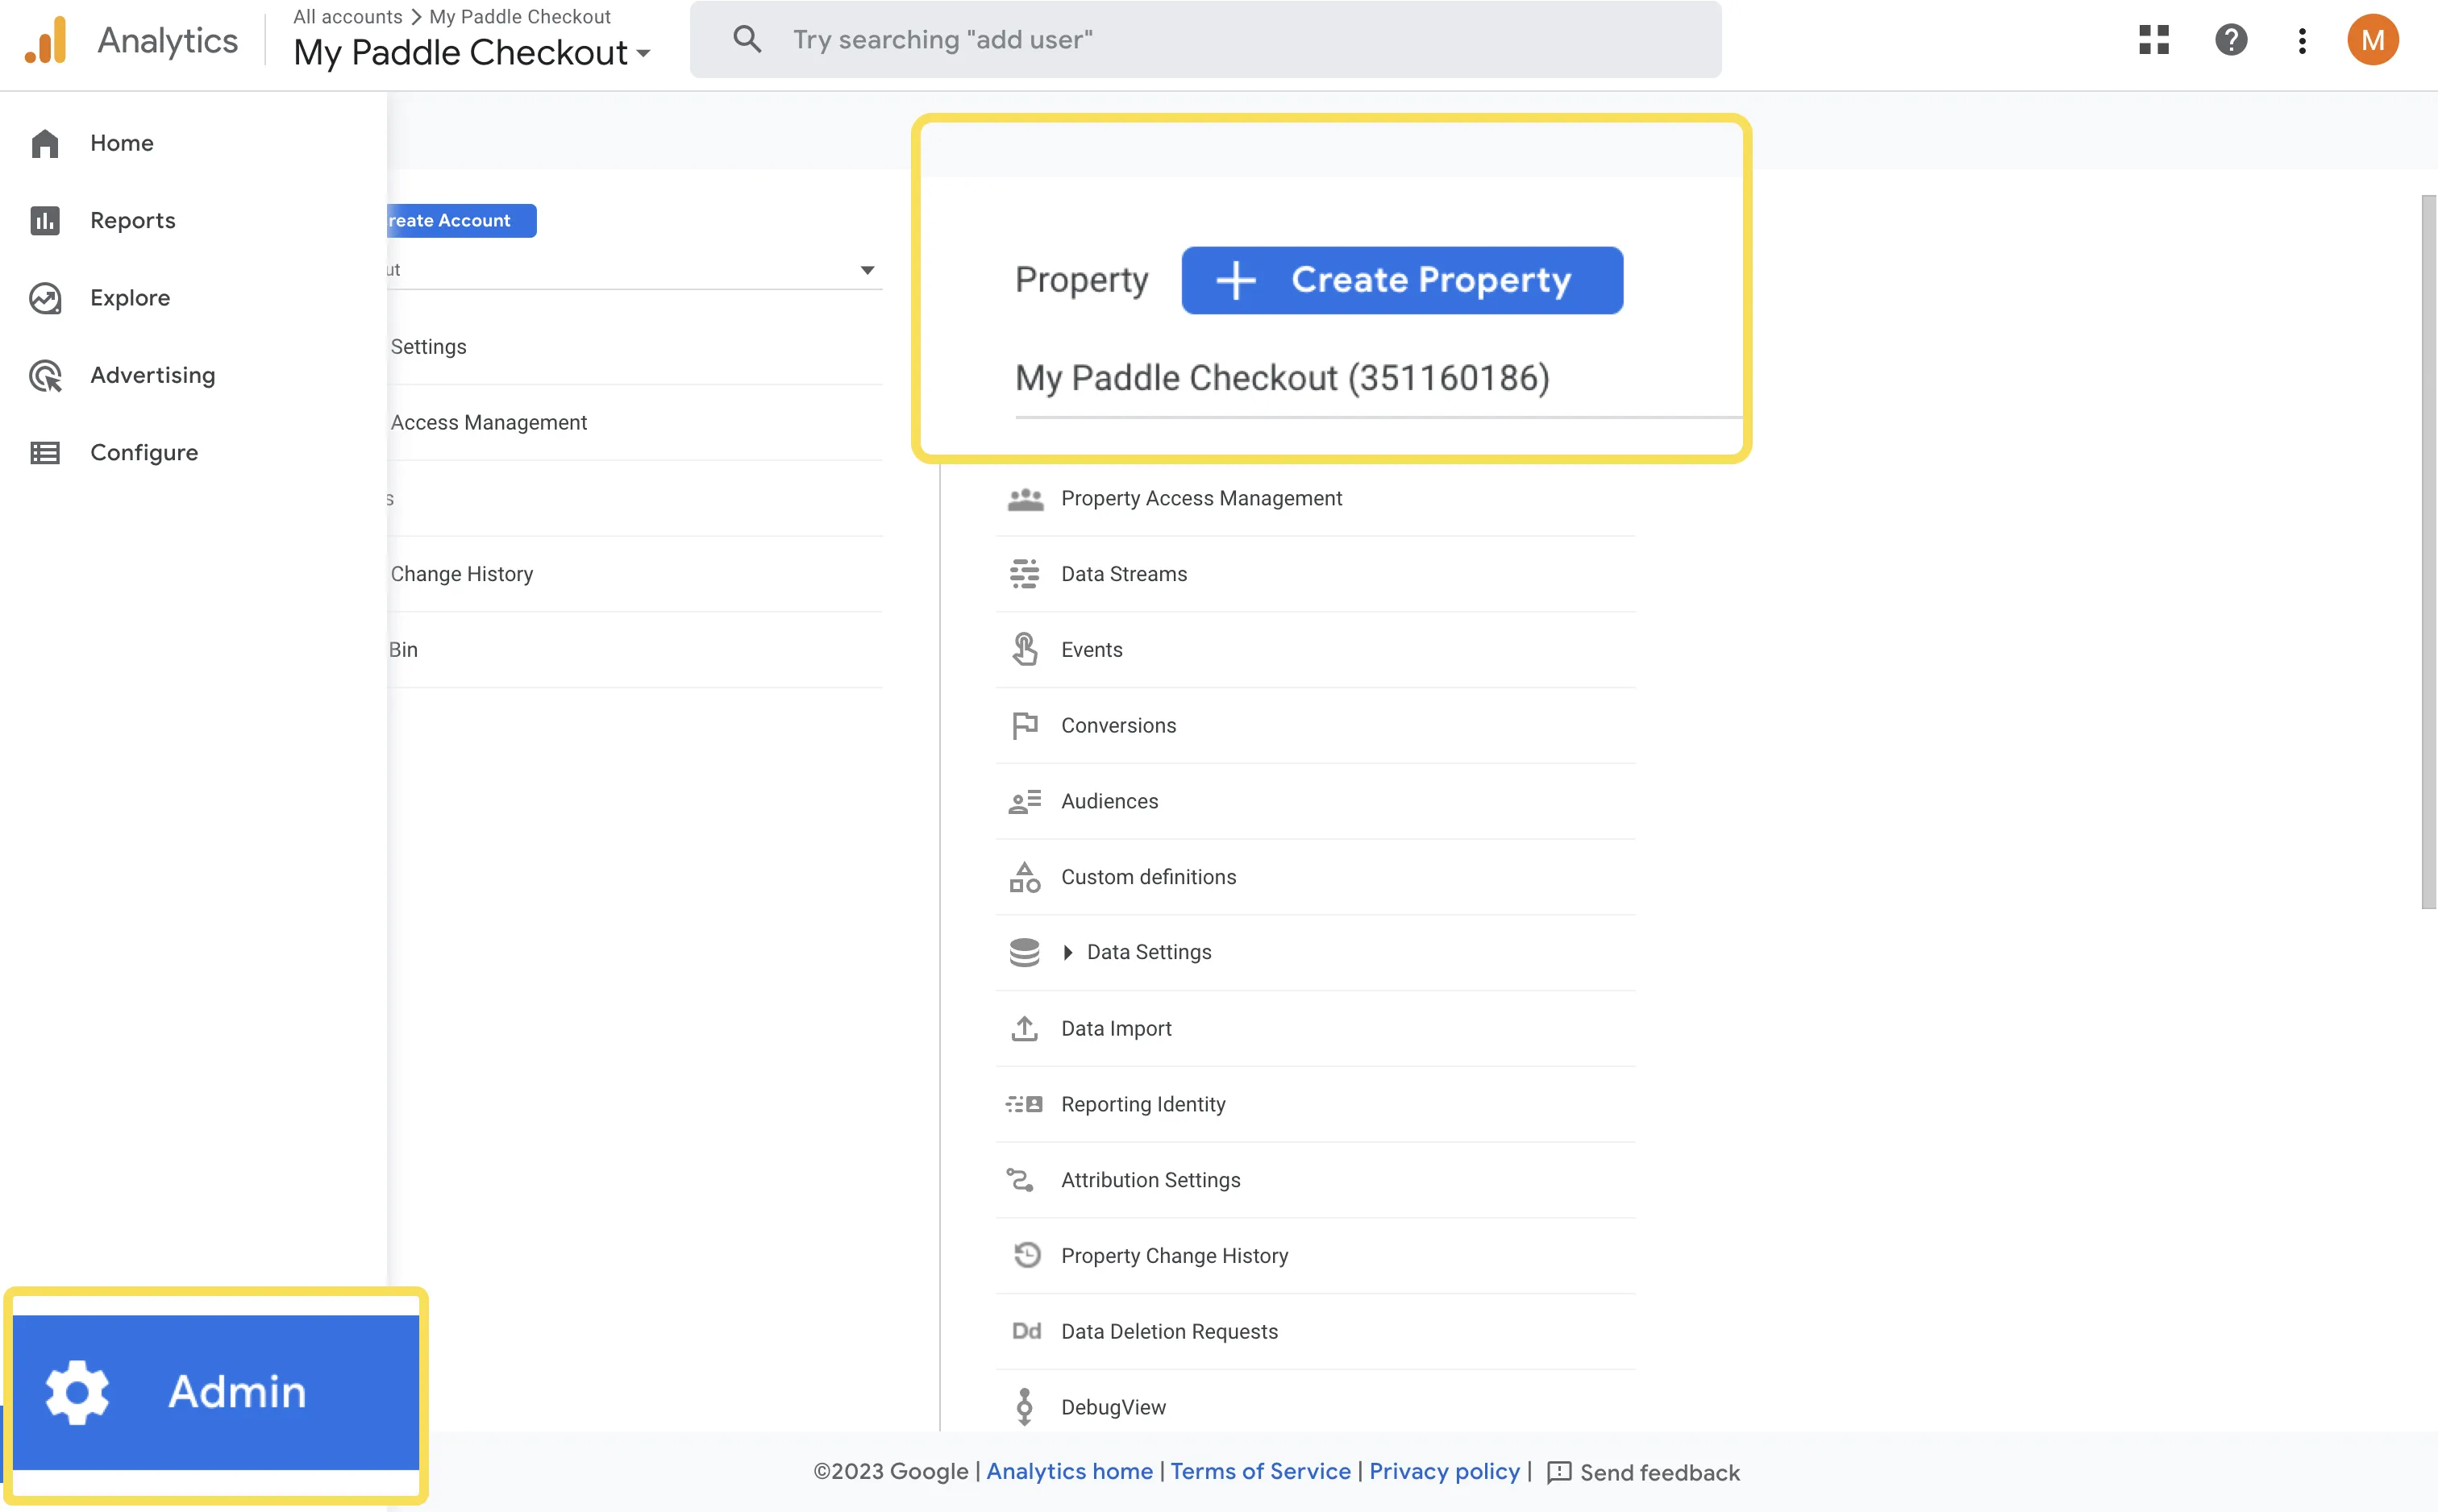
Enter a name for your property, then choose other settings to suit your business.
Create a data stream
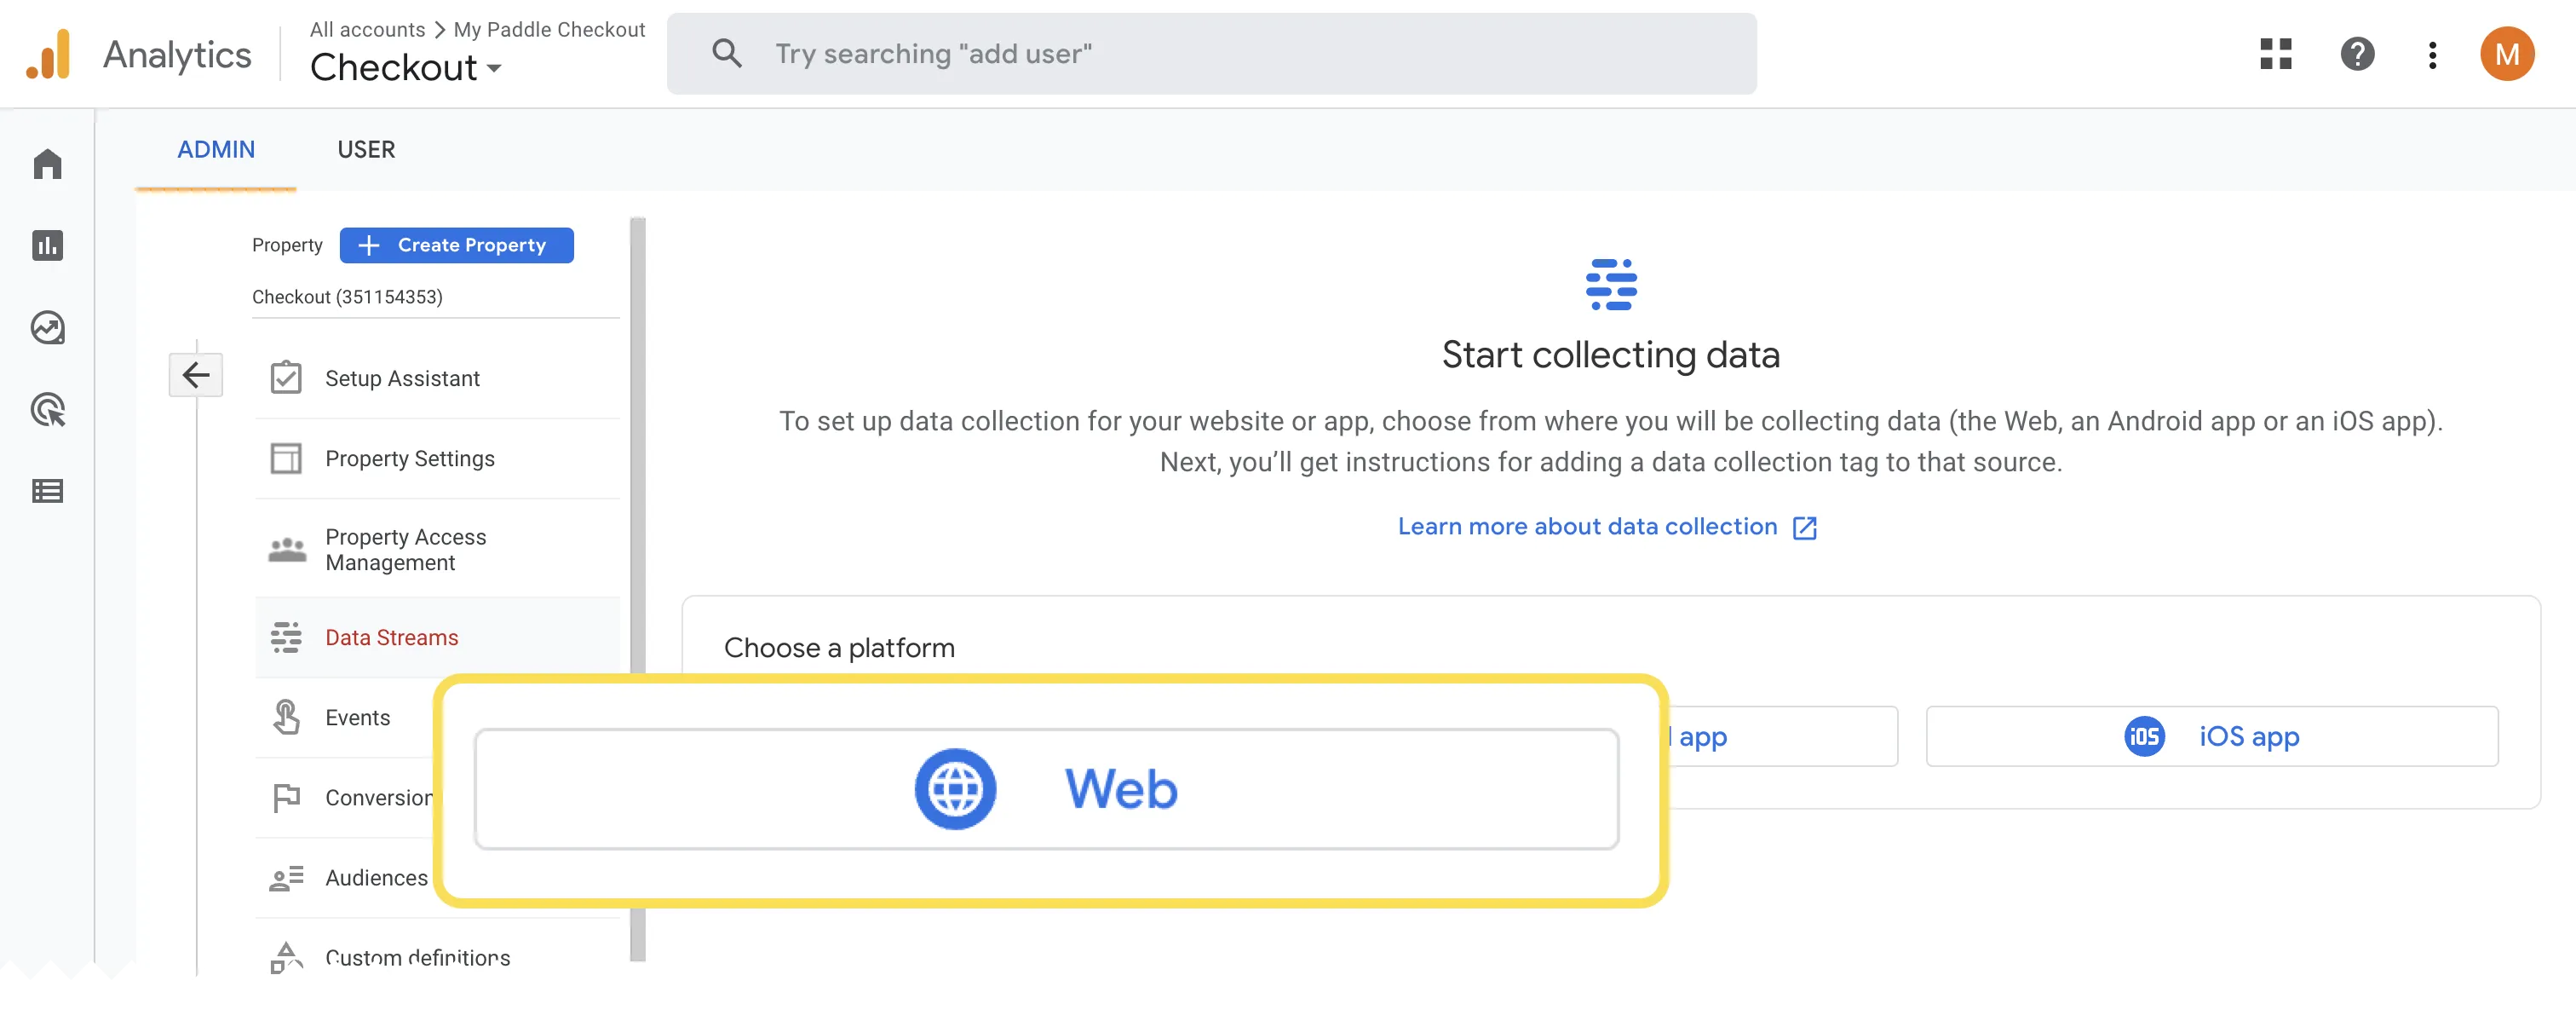
Section titled “Create a data stream”If you’ve just created a property, you should be dropped into the Data Streams page. If not, go to Admin > Data Streams.
Choose Web, then fill out the information to create a data stream.
Get your measurement ID
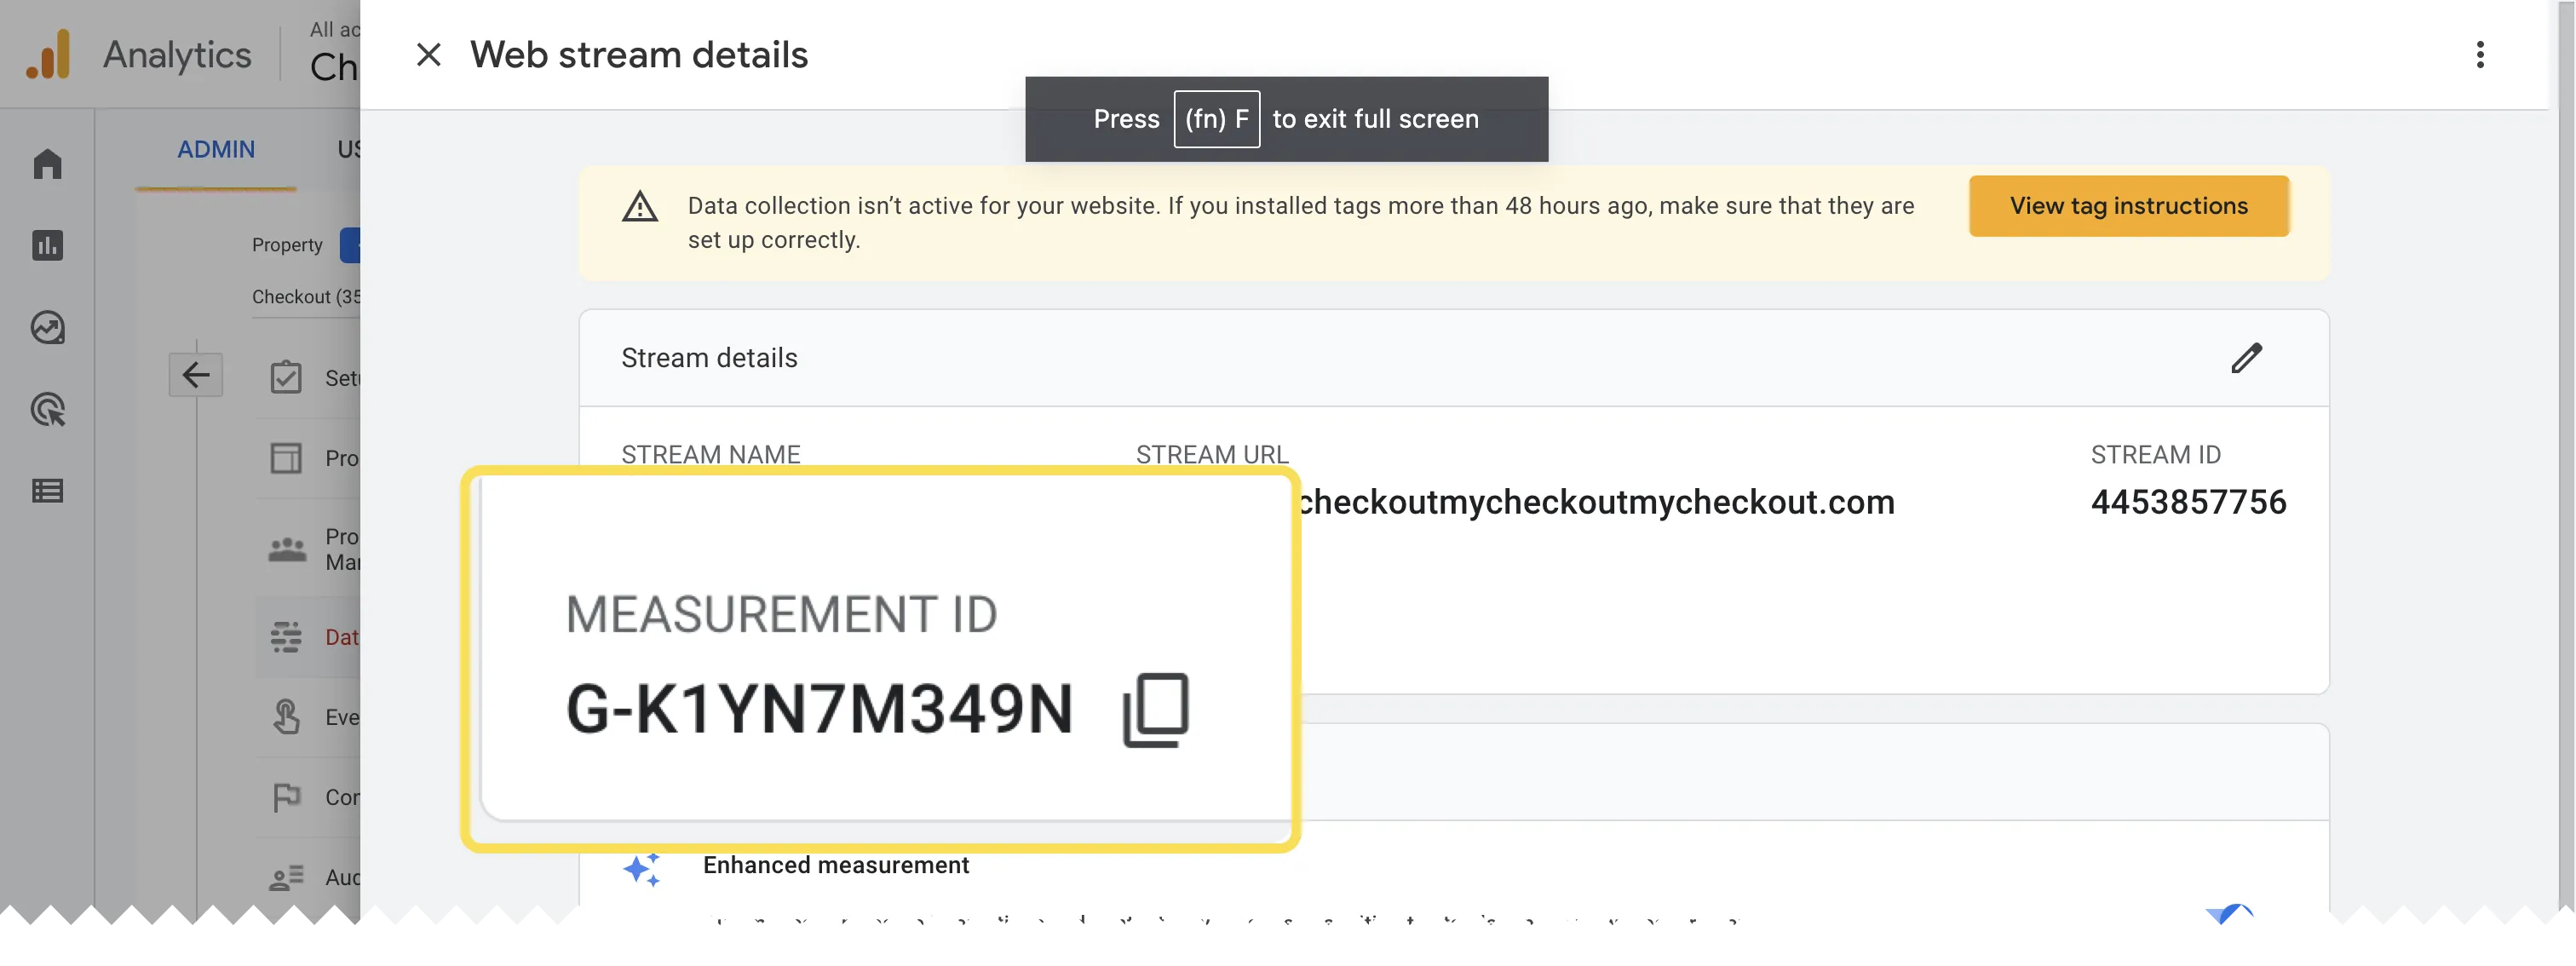
Section titled “Get your measurement ID”Close the prompt asking you to install the Google tag on your website. We’re going to use Google Tag Manager instead.
On the web stream details screen, find your measurement ID and copy it. We’ll come back to this later.
Set up Google Tag Manager
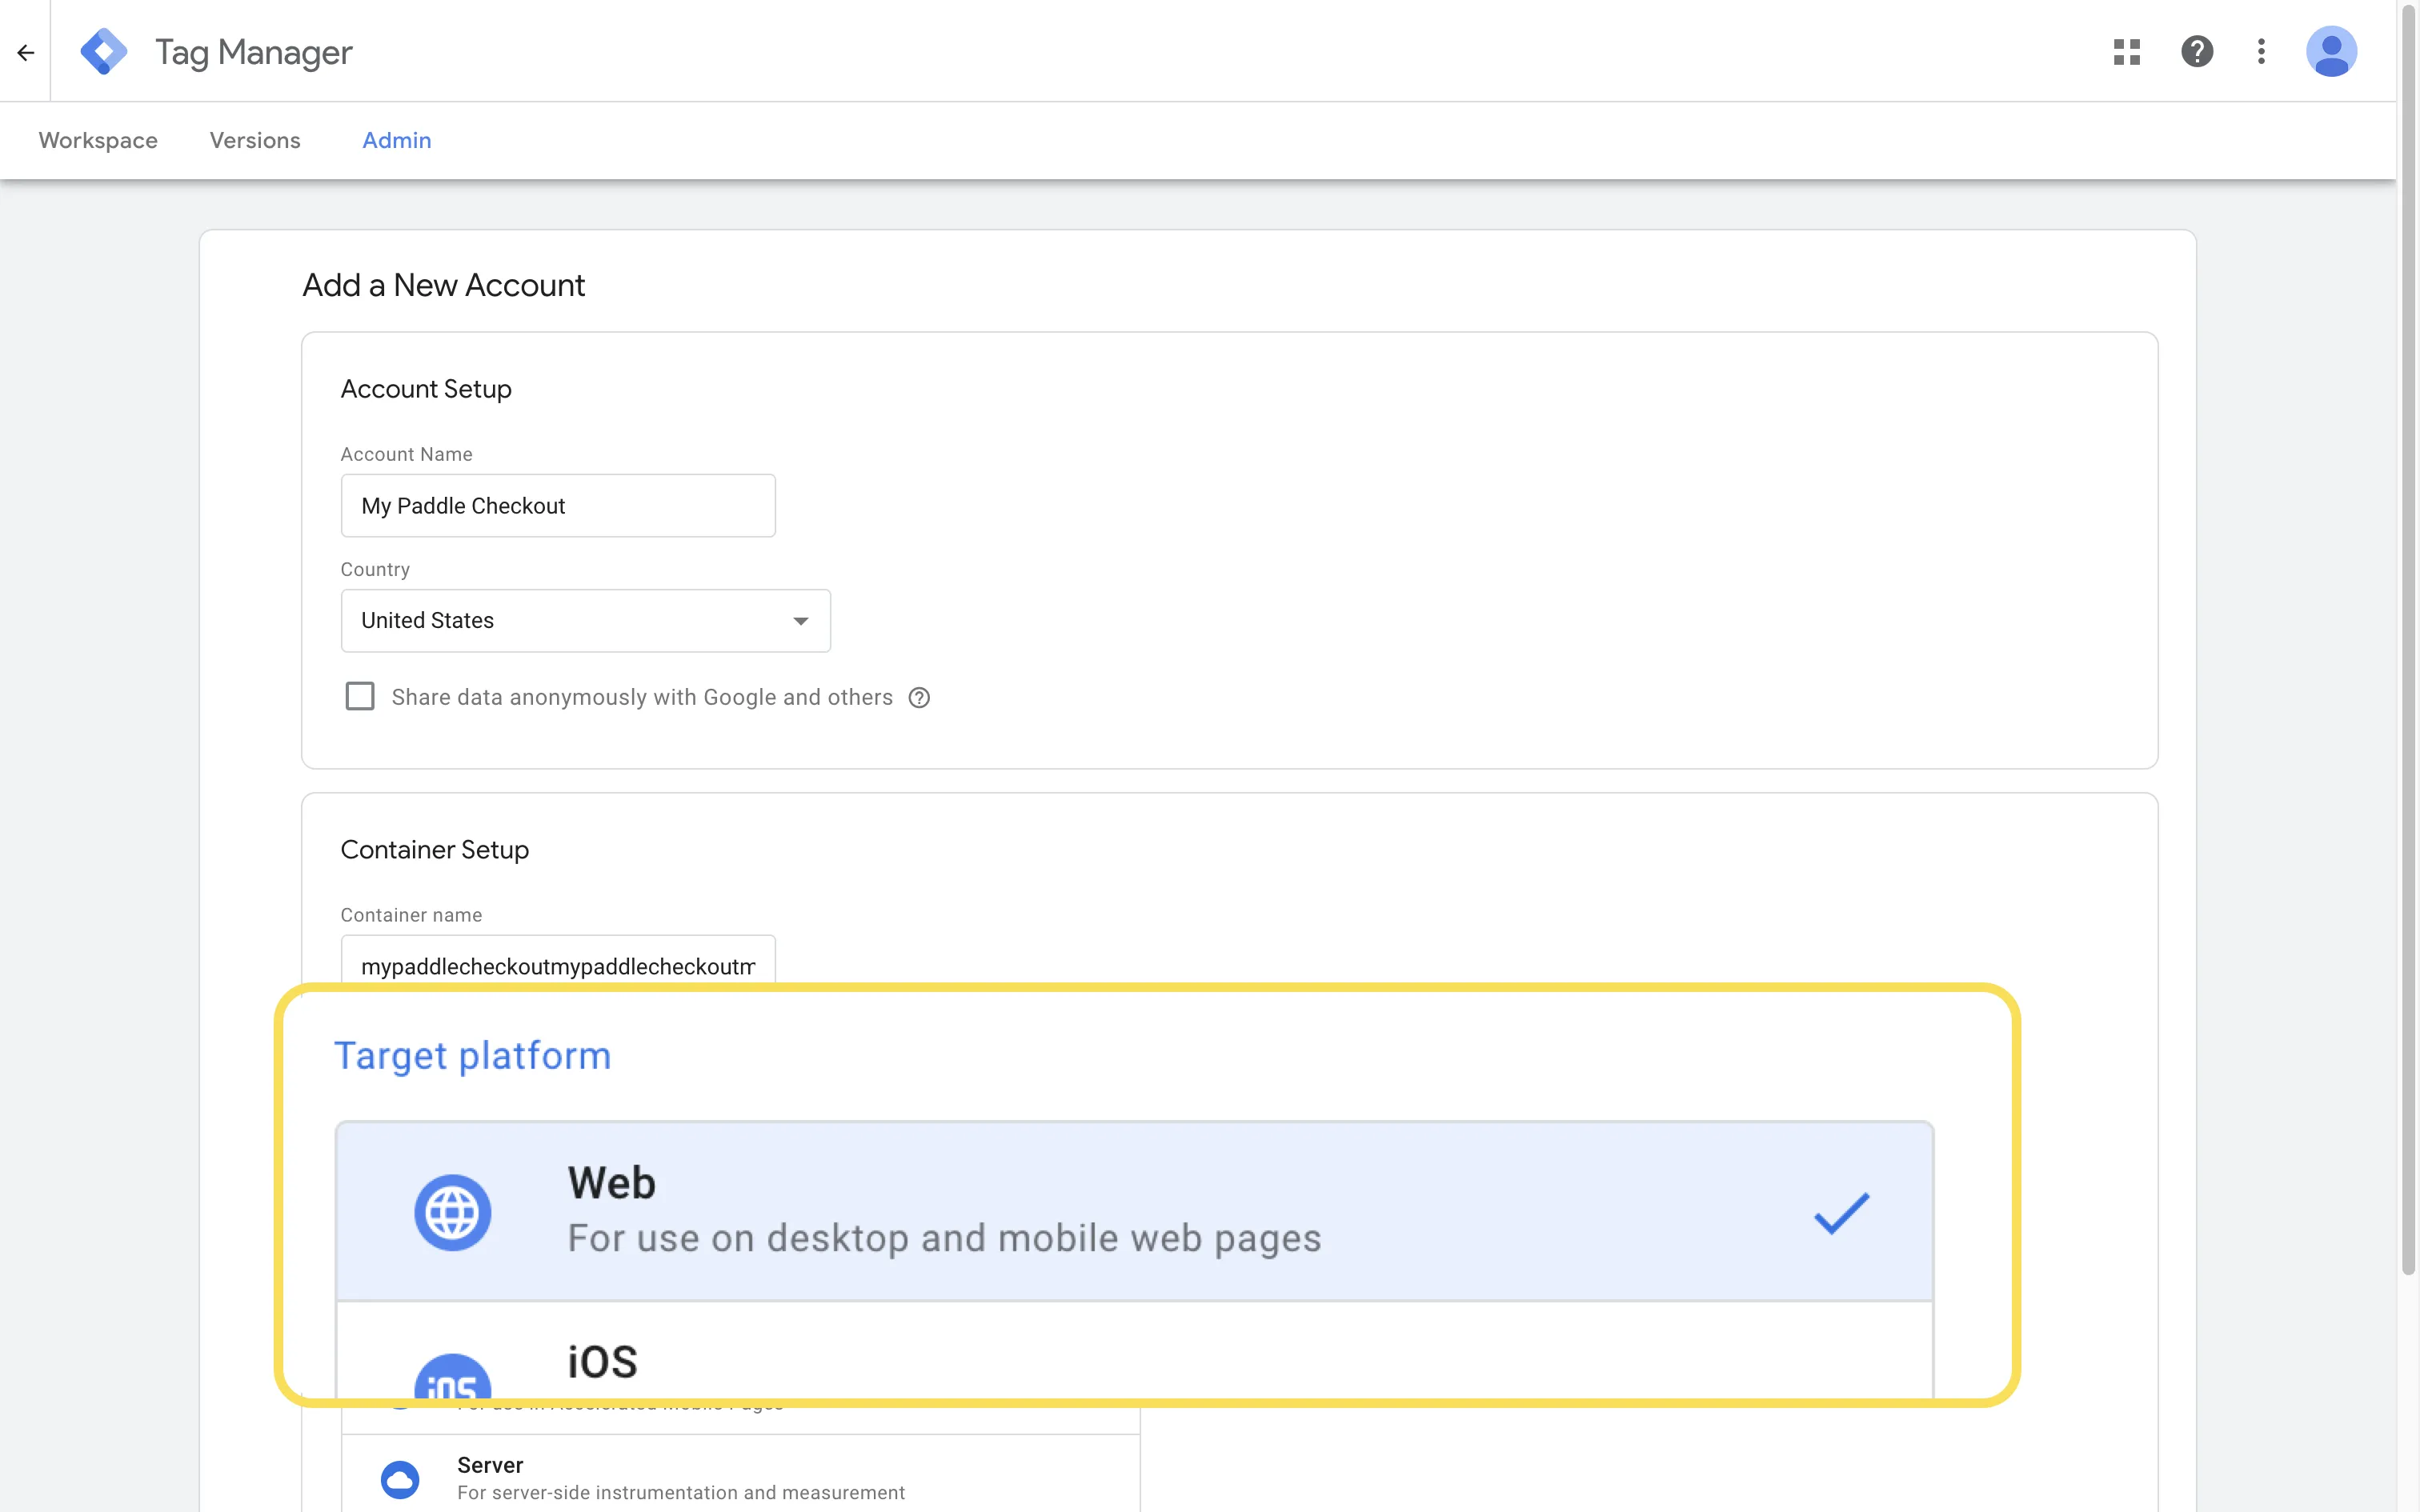
Section titled “Set up Google Tag Manager”From the Google Tag Manager dashboard, click Create Account
Enter the details to create an account, choosing Web as the target platform.
Create a trigger
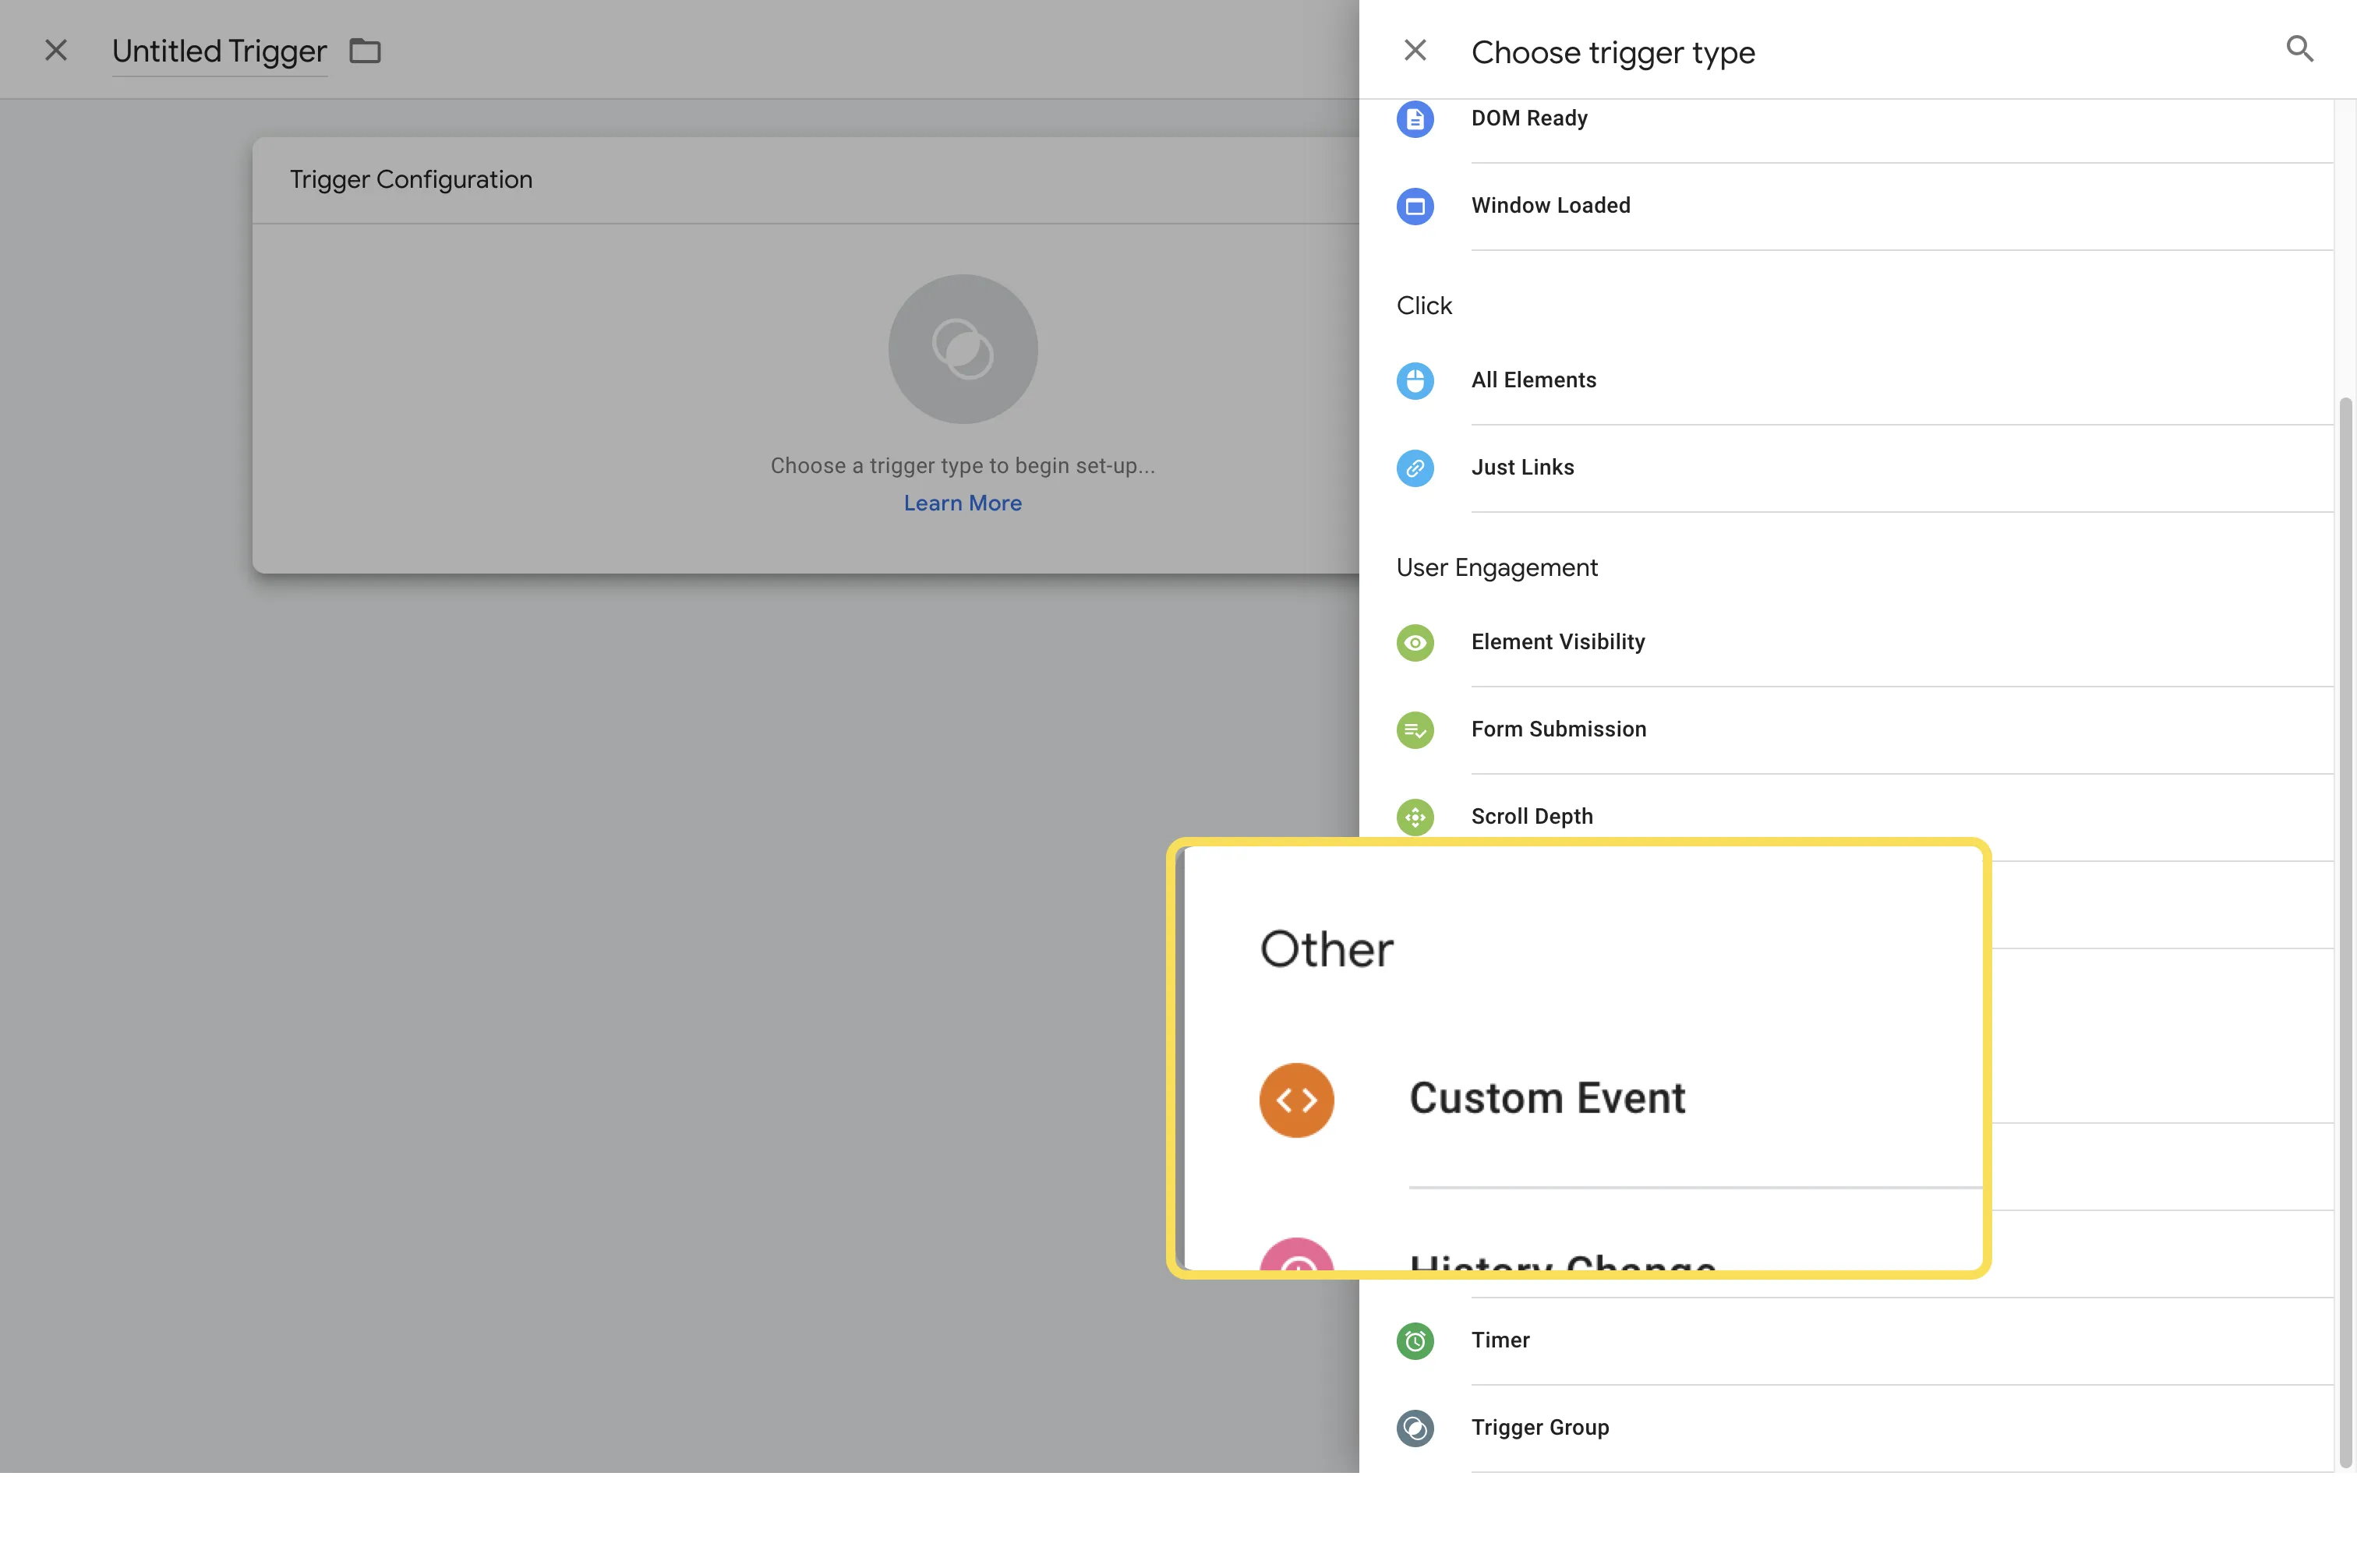
Section titled “Create a trigger”From the Google Tag Manager dashboard, go to Triggers then click New.
Enter a name for your tag, then click Trigger Configuration.
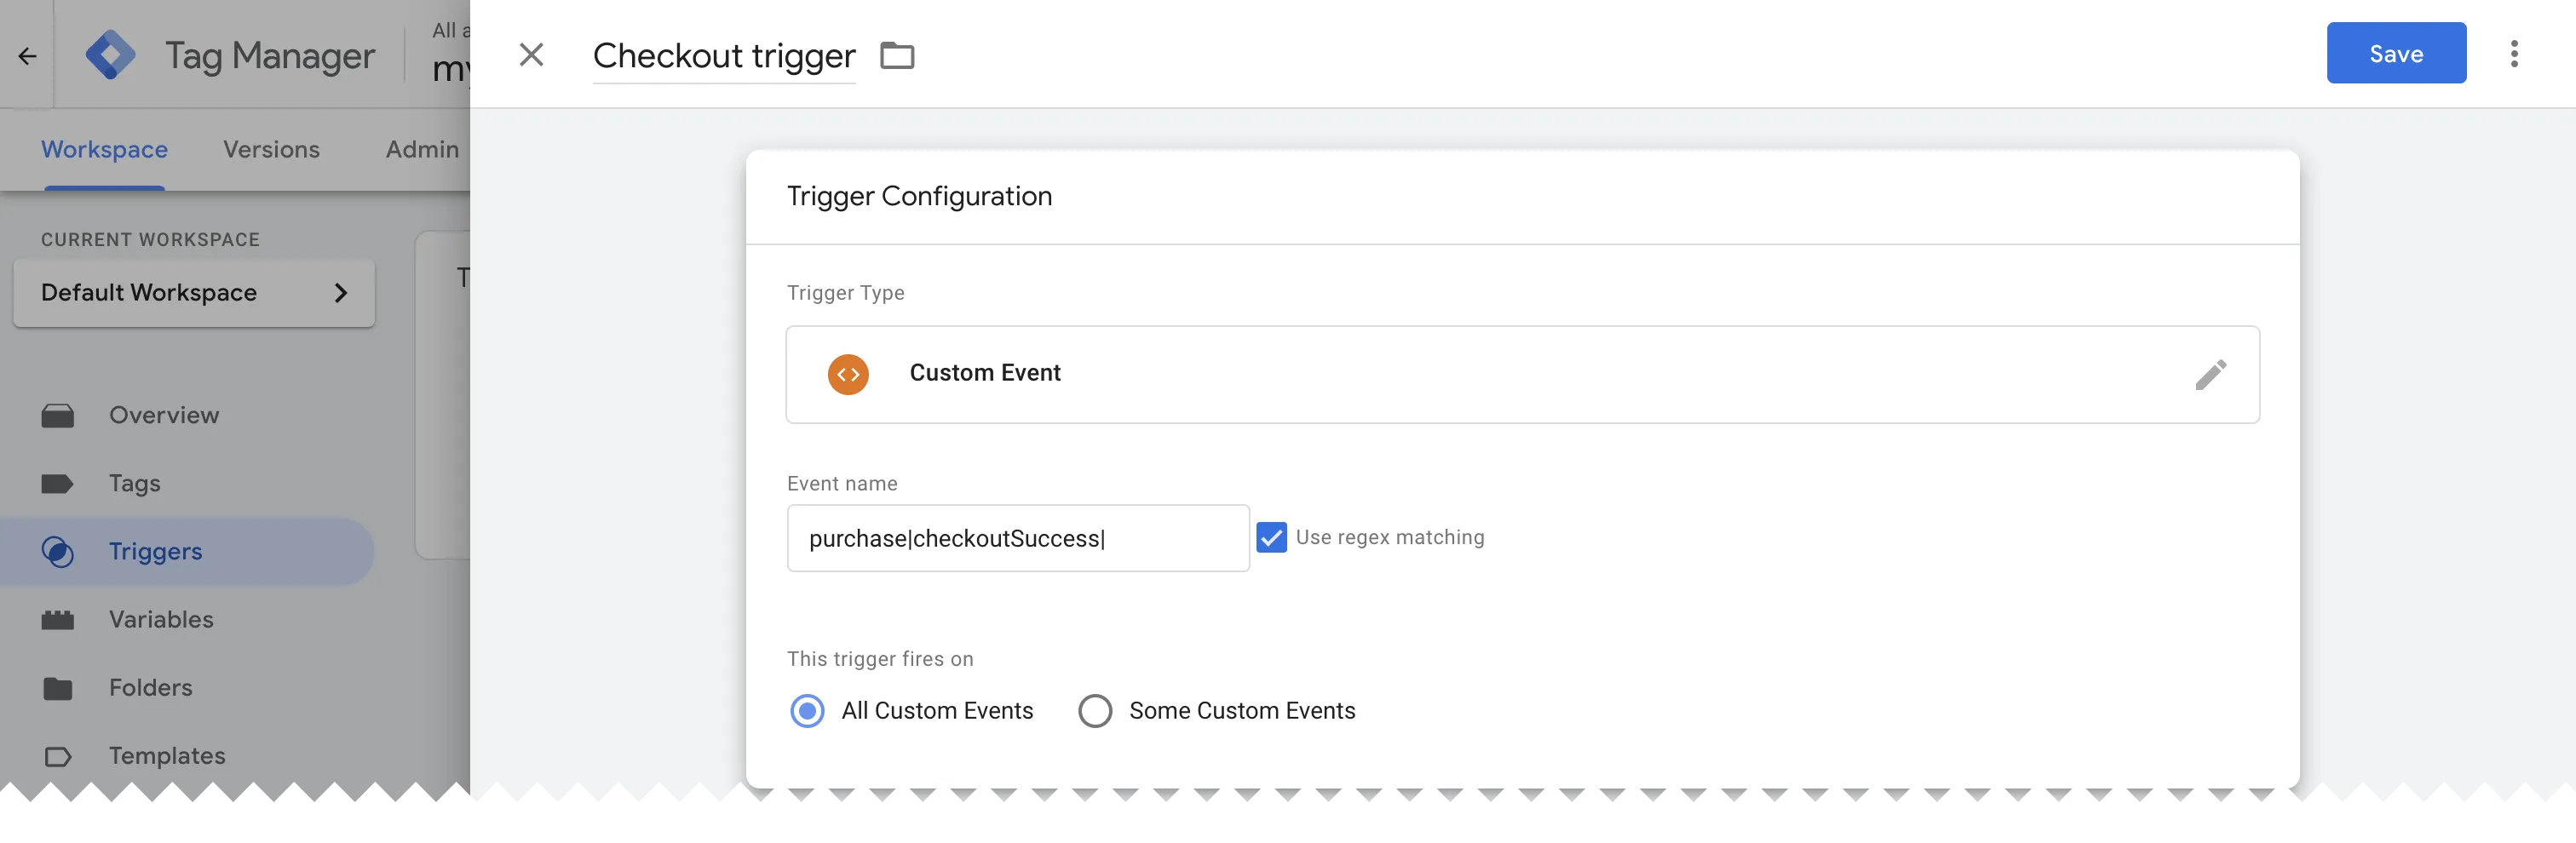
Choose Custom Event as the trigger type.
Check the UseRegEx matching box, then enter the names of the events that you’d like to send to Google Analytics separated by a pipe character. Add a final pipe character.
For example, to watch for purchase or checkoutSuccess then add: purchase|checkoutSuccess|
Create tags
Section titled “Create tags”Next, we’ll create a configuration tag and an event tag to capture and forward events from Tag Manager to Google Analytics.
Create a configuration tag
Section titled “Create a configuration tag”From the Google Tag Manager dashboard, go to Tags then click New.
Enter a name for your tag, then click Tag Configuration.
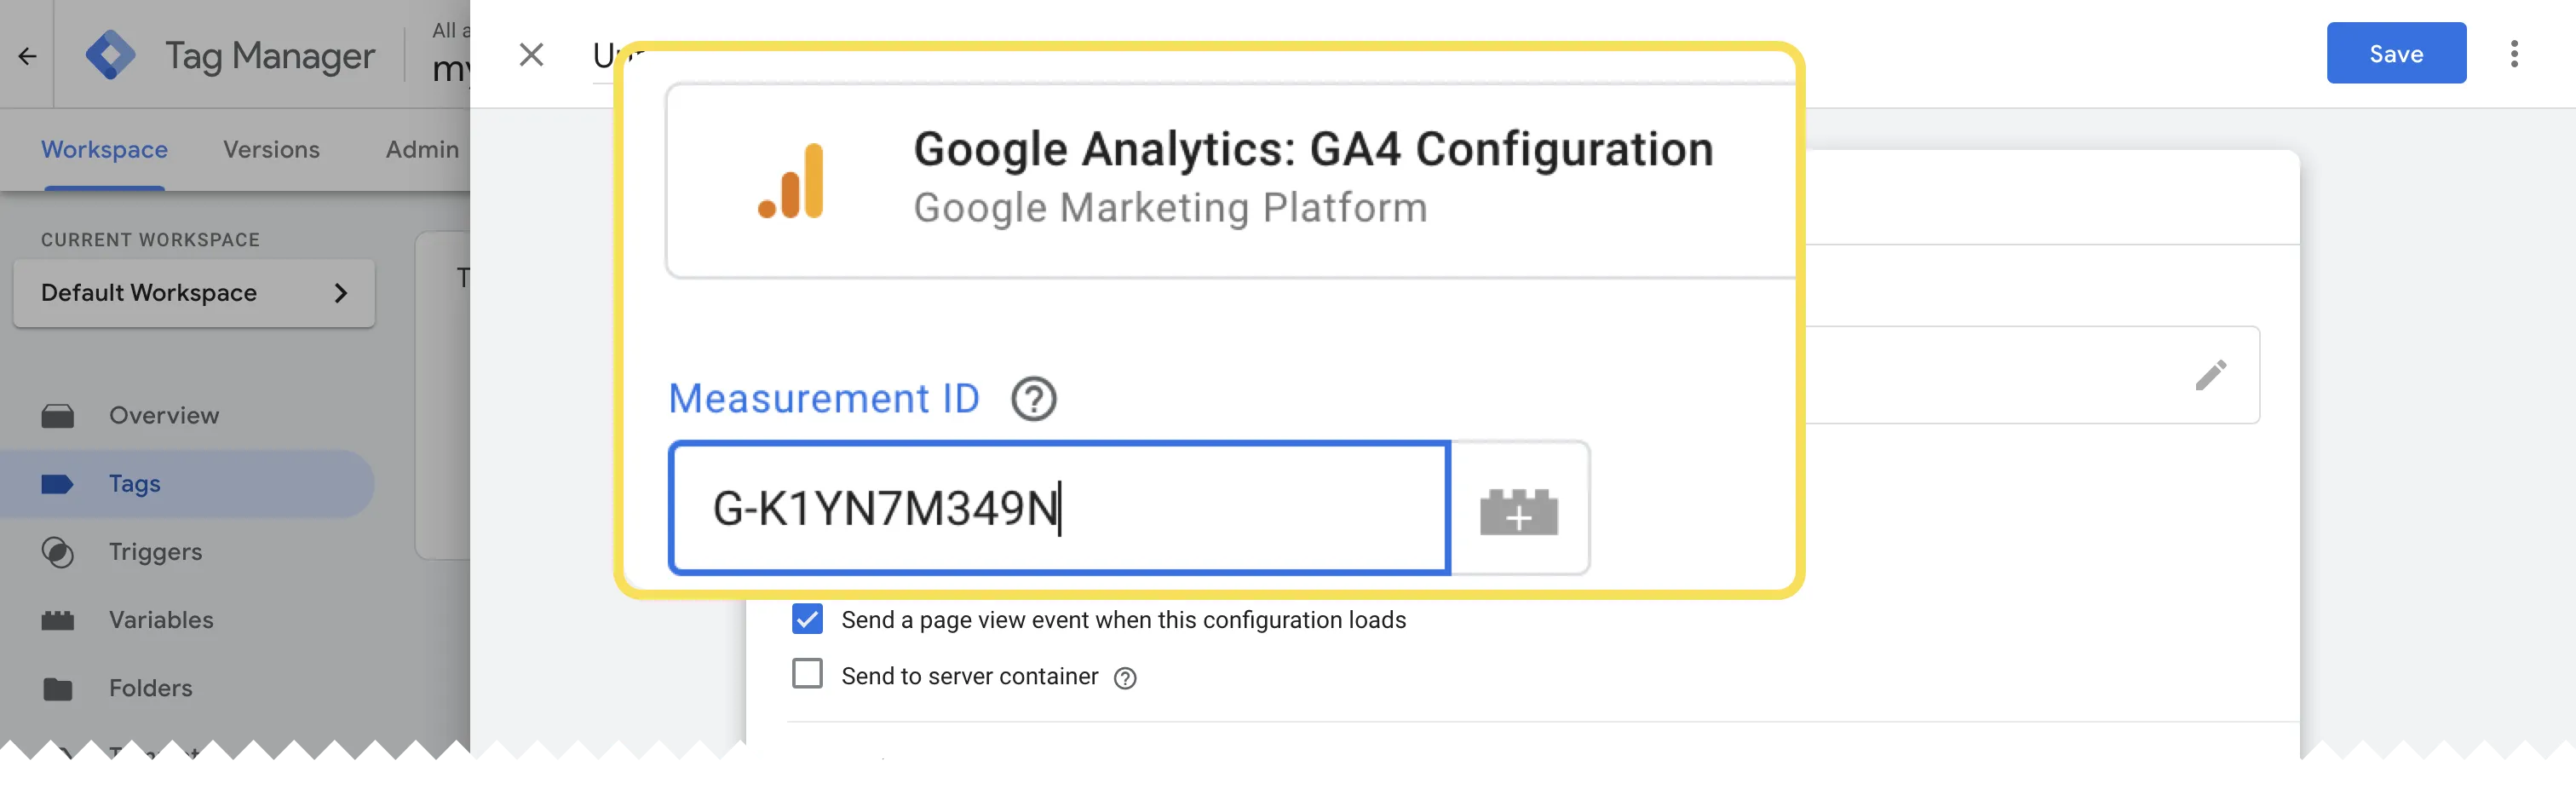
Choose Google Analytics: GA4 Configuration as the type.
Paste your measurement ID from earlier. You don’t need to change any other settings and there’s no need to add a trigger.
Create an event tag
Section titled “Create an event tag”Go to Tags then click New.
Enter a name for your tag, then click Tag Configuration.
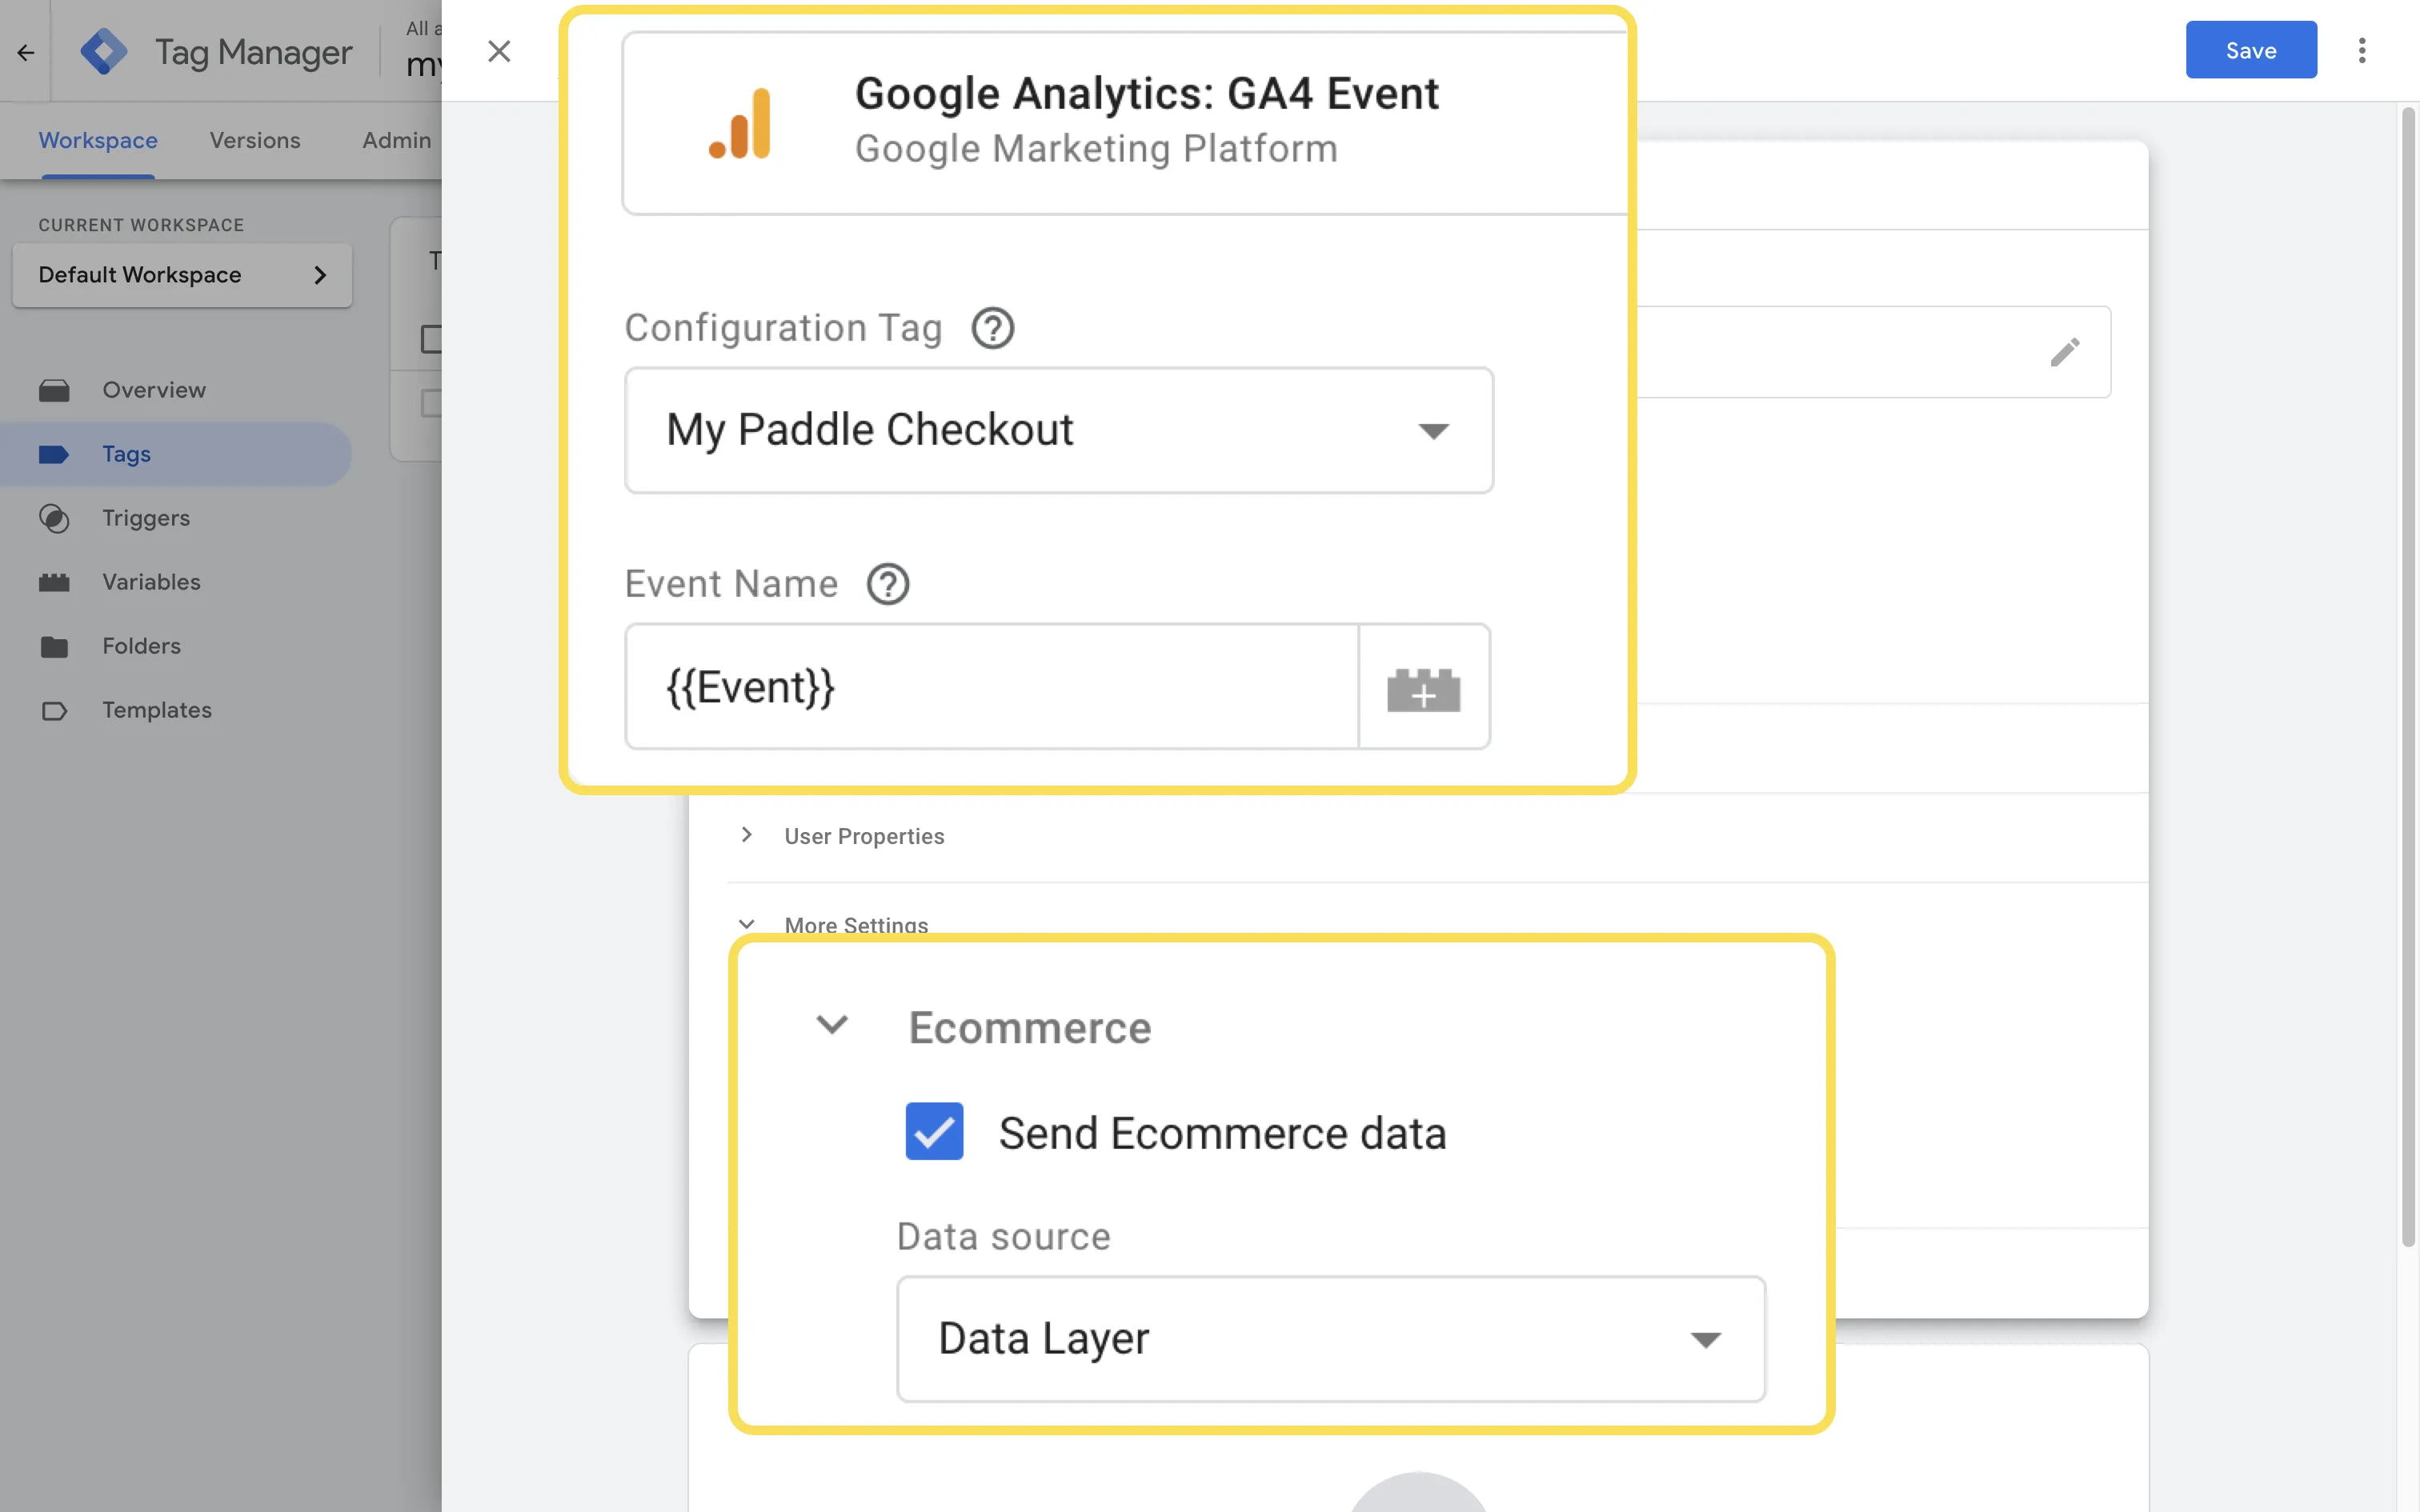
This time, choose Google Analytics: GA4 Event as the type. Then:
- Set the tag you just created as the configuration tag
- Enter
{{Event}}as the Event Name. - Open the More Settings section, then check Send Ecommerce data.
- Set data source to Data Layer.
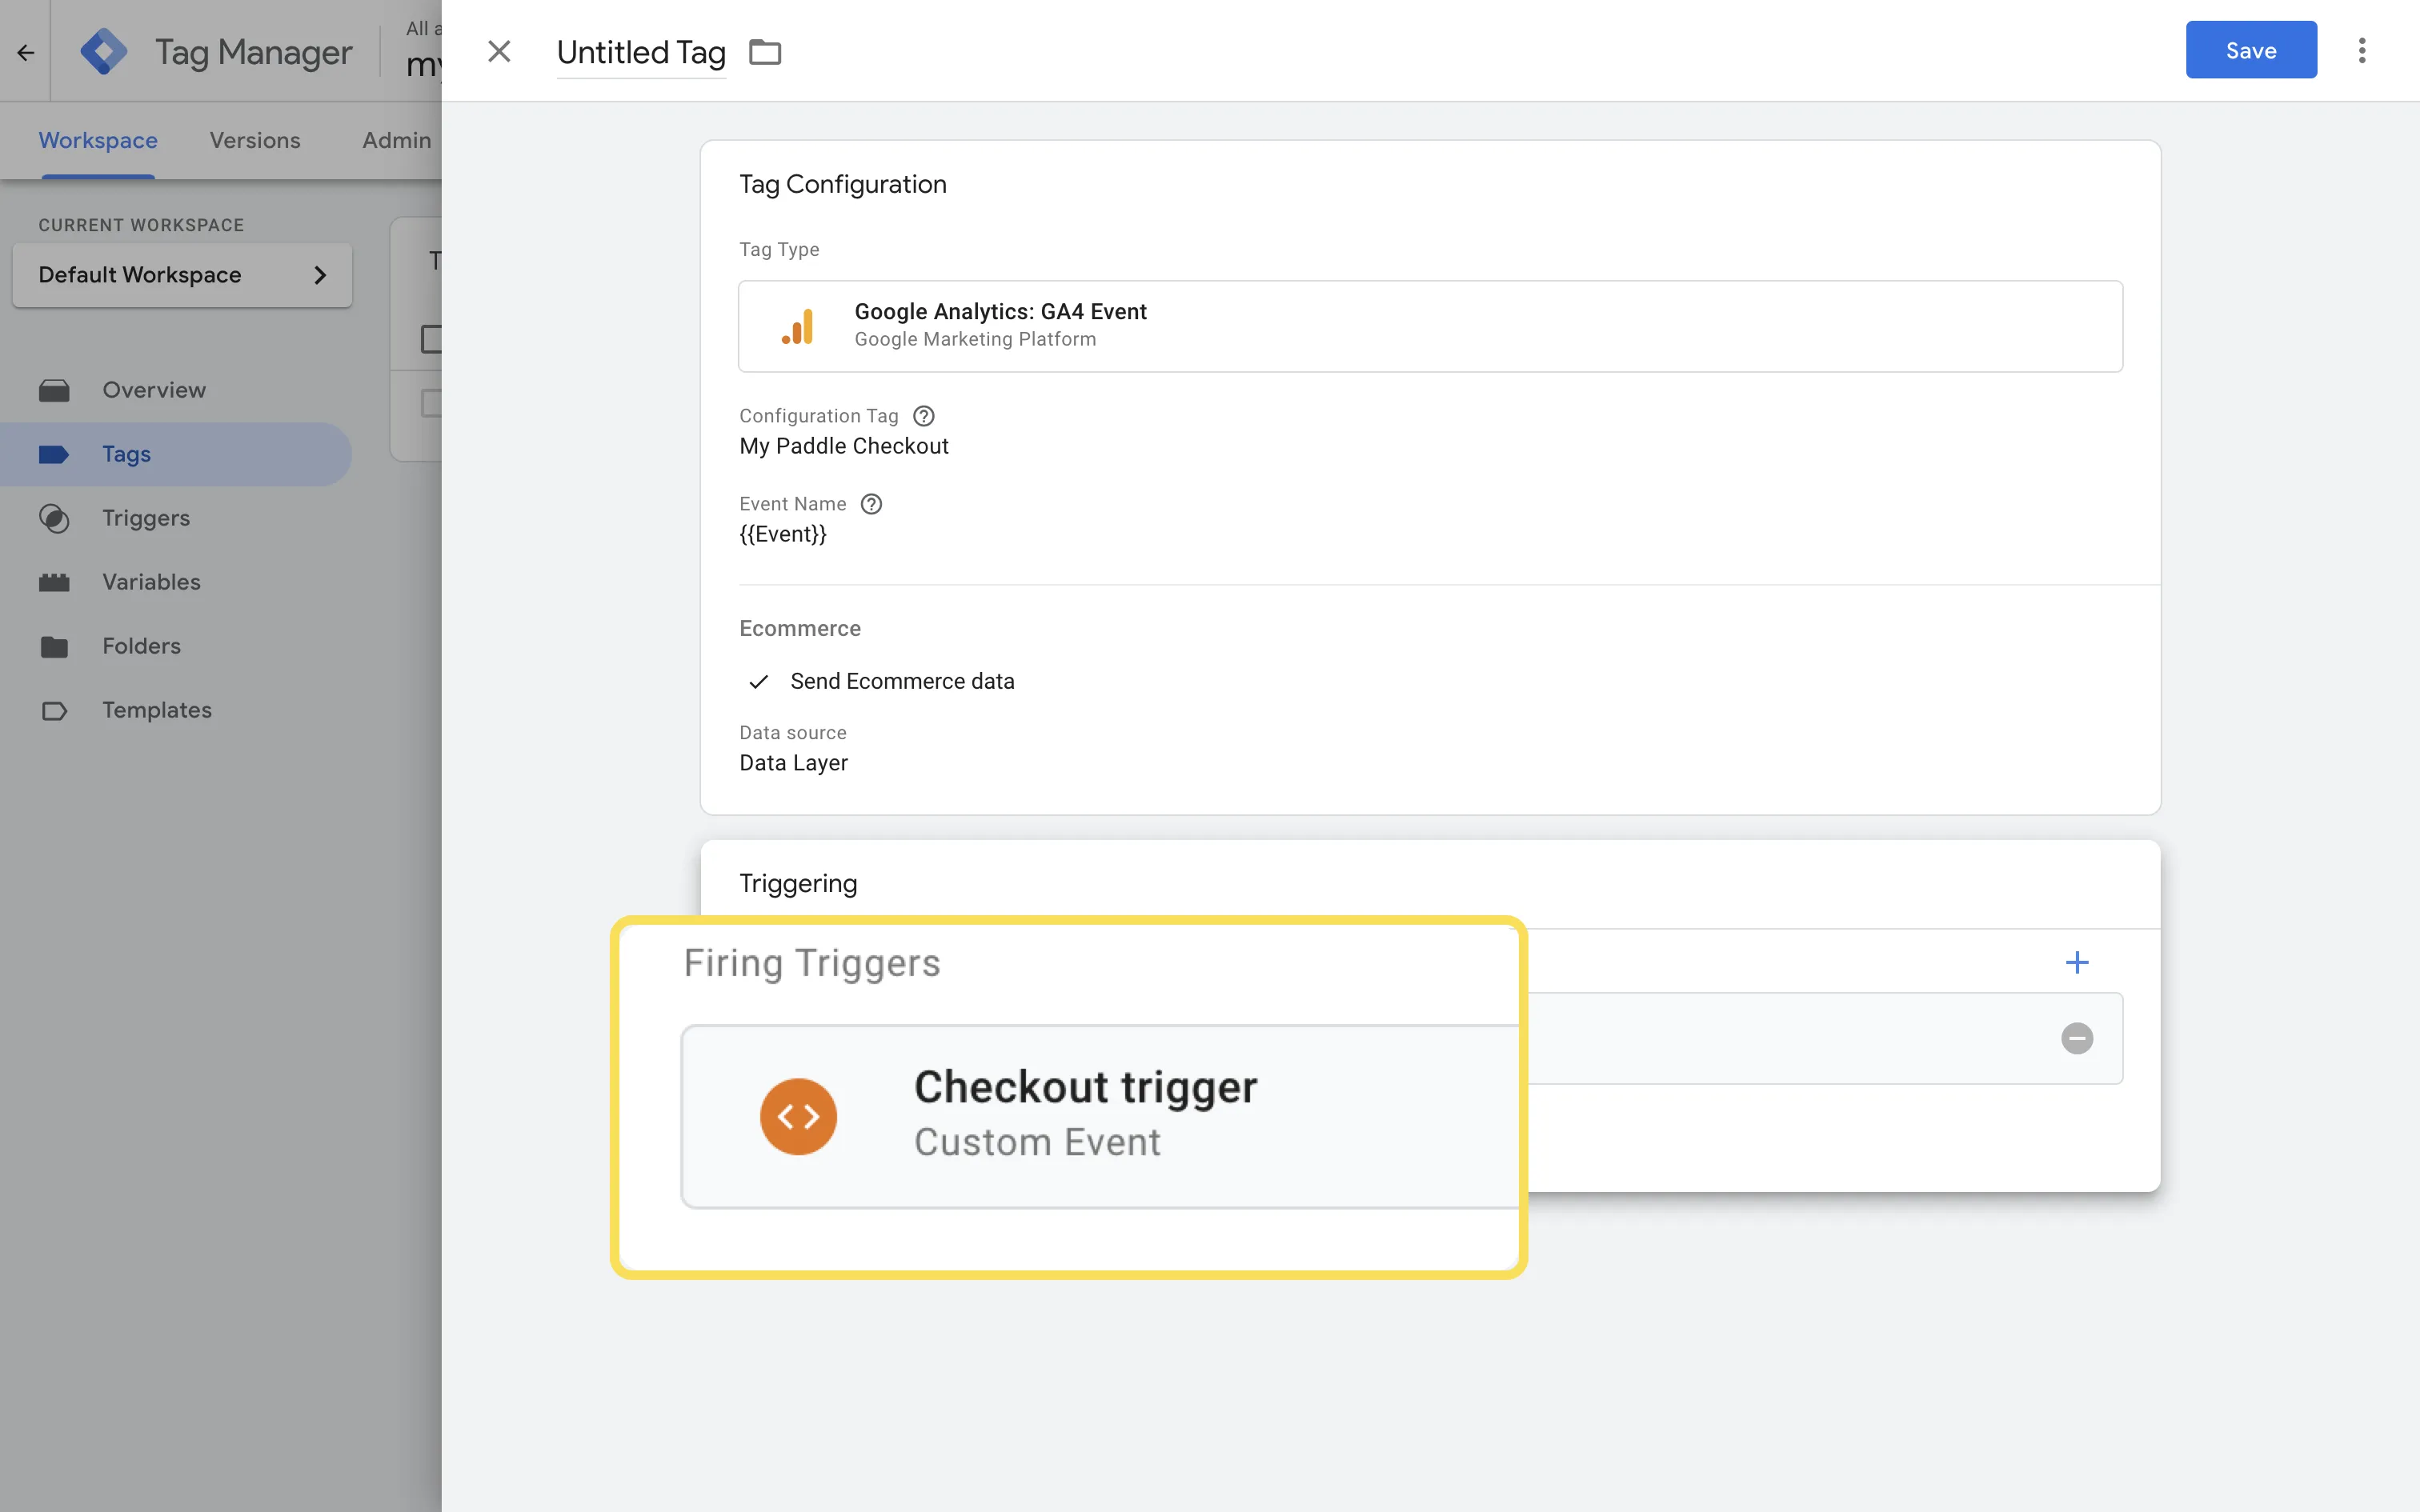
When you’re done, click in the Triggering section and choose the custom event you just made as the trigger.
Publish tags
Section titled “Publish tags”When you’ve created your trigger, event tag, and configuration tag, click Submit. On the next screen, click Publish.
Update your checkout
Section titled “Update your checkout”Install Tag Manager
Section titled “Install Tag Manager”From the Google Tag Manager dashboard, click on your tag Manager ID to get the code snippets you need to install Tag Manager on your page.
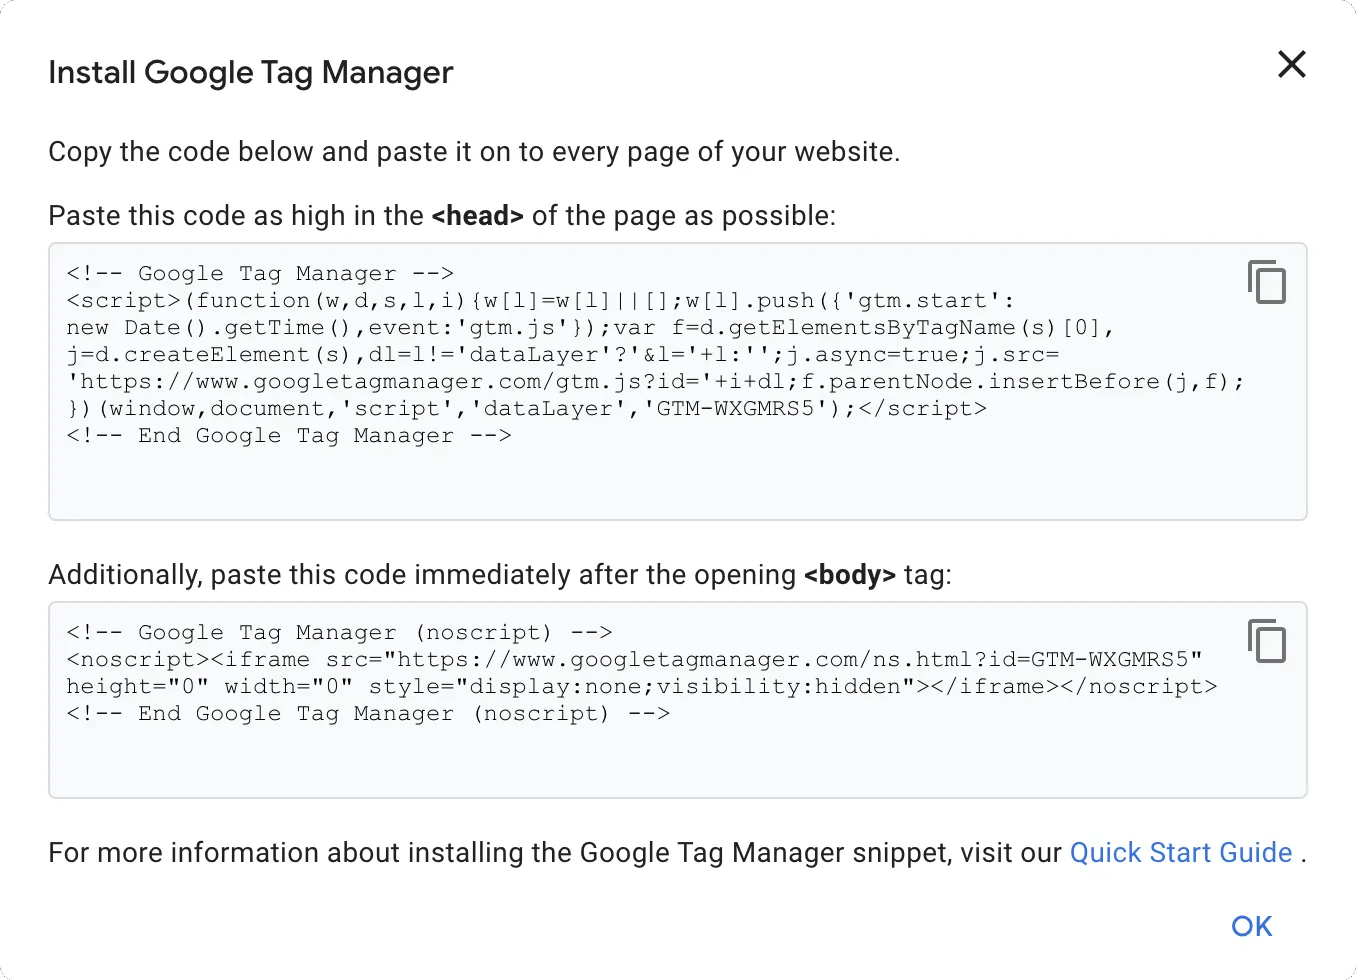
Add the code to your checkout page.
Send events
Section titled “Send events”Next, we need to send events to Google Tag Manager.
There are three callbacks you can use in Paddle.js:
| Callback | Method | Blocking | Description |
|---|---|---|---|
successCallback | Paddle.Checkout.open() | Yes | Called on checkout completion. |
closeCallback | Paddle.Checkout.open() | Yes | Called on checkout close. |
eventCallback | Paddle.Setup() | No | Called for every checkout event. |
For measuring conversion, we recommend using eventCallback because it occurs in the background without blocking other checkout operations. As well as success (Checkout.Complete) and close (Checkout.Close) tracking, it supports events throughout the checkout journey.
For example, your checkout funnel might look like this:
| Event | Description |
|---|---|
Checkout.Loaded | Customer opens Paddle checkout. |
Checkout.Customer.Details | Customer lands on the screen to enter their email and location details. |
Checkout.Payment.Selection | Customer lands on the screen to choose a payment method. |
Checkout.Payment.Selected | Customer chooses a payment method. |
Checkout.PaymentComplete | Customer payment goes through successfully. |
Add your callback to your checkout, using a datalayer push to send data to Google Tag Manager.
In this example, we send information for a purchase event:
Paddle.Setup({ vendor: , eventCallback: function (data) { if (data.event === "Checkout.Complete") { let dataLayerInfo = { event: "purchase", ecommerce: { transaction_id: data.eventData.checkout.id, affiliation: "Insert Your Affiliation", value: data.eventData.checkout.prices.customer.total, tax: data.eventData.checkout.prices.customer.total_tax, shipping: null, currency: data.eventData.checkout.prices.customer.currency, coupon: data.eventData.checkout.coupon.coupon_code, items: data.eventData.checkout.prices.customer.items, }, }; dataLayer.push(dataLayerInfo); } } })This example is a complete Paddle checkout page that uses eventCallback to send ecommerce information to Google Tag Manager.
Use the code comments to add your own:
- vendor ID
- product ID
- coupon
<!DOCTYPE html><html lang="en">  <head>    <!-- Google Tag Manager -->    <script>      (function (w, d, s, l, i) {        w[l] = w[l] || [];        w[l].push({ "gtm.start": new Date().getTime(), event: "gtm.js" });        var f = d.getElementsByTagName(s)[0],          j = d.createElement(s),          dl = l != "dataLayer" ? "&l=" + l : "";        j.async = true;        j.src = "https://www.googletagmanager.com/gtm.js?id=" + i + dl;        f.parentNode.insertBefore(j, f);      })(window, document, "script", "dataLayer", "GTM-AAAAAAA"); // replace with your Google Tag Manager ID    </script>    <!-- End Google Tag Manager -->
    <meta charset="UTF-8" />    <meta http-equiv="X-UA-Compatible" content="IE=edge" />    <meta name="viewport" content="width=device-width, initial-scale=1.0" />    <title>Document</title>  </head>
  <body>    <!-- Google Tag Manager (noscript) -->    <noscript      ><iframe        src="https://www.googletagmanager.com/ns.html?id=GTM-AAAAAAA" // replace with your Google Tag Manager ID        height="0"        width="0"        style="display: none; visibility: hidden"      ></iframe    ></noscript>    <!-- End Google Tag Manager (noscript) -->
    <h1>Checkout Form</h1>    <button id="checkoutButton">Express Checkout</button>    <script src="https://cdn.paddle.com/paddle/paddle.js"></script>    <script type="text/javascript">      const $ = (x) => document.getElementById(x);      $("checkoutButton").addEventListener("click", checkoutSetup);
      Paddle.Environment.set("sandbox"); // remove to use the live environment      Paddle.Setup({        vendor: , // add your Paddle vendor ID        eventCallback: function (data) {          if (data.event === "Checkout.Complete") {            let dataLayerInfo = {              event: "purchase",              ecommerce: {                transaction_id: data.eventData.checkout.id,                affiliation: "Insert Your Affiliation",                value: data.eventData.checkout.prices.customer.total,                tax: data.eventData.checkout.prices.customer.total_tax,                shipping: null,                currency: data.eventData.checkout.prices.customer.currency,                coupon: data.eventData.checkout.coupon.coupon_code,                items: data.eventData.checkout.prices.customer.items,              },            };            dataLayer.push(dataLayerInfo);          }        }      })
      // Add a product, email, and coupon      // 100% off coupons make testing easy      // country set to AF to avoid post code      function checkoutSetup() {        let coupon = "";        Paddle.Checkout.open({          product: ,          email: "",          country: "AF",          coupon: coupon,        });      }    </script>  </body></html>
Check your results
Section titled “Check your results”After checkout success, check Google Tag Manager. You should see:
- your event tag under the Tags Fired section in the tags tab
- your Google Analytics ID at the top
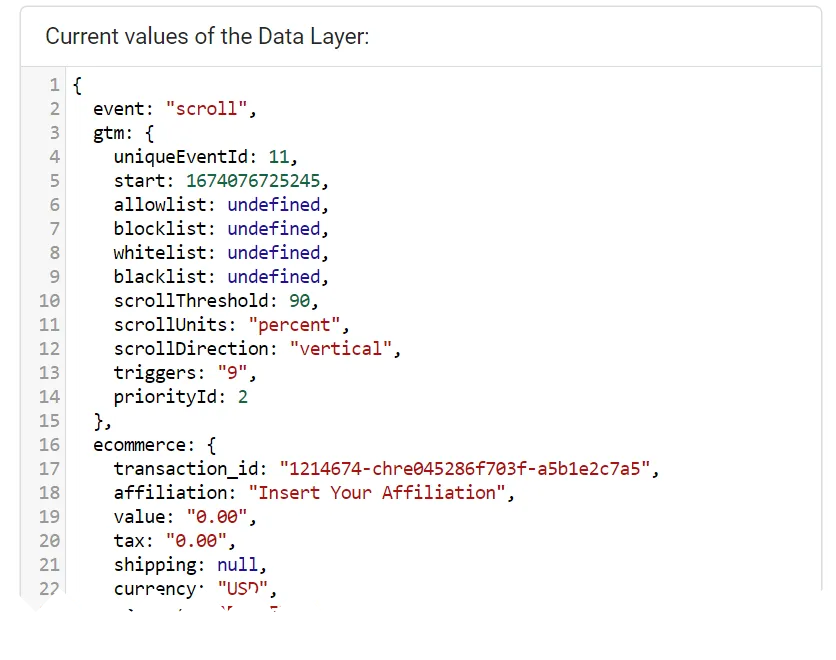
- a summary that includes in the purchase event
In Google Analytics, you should see a Purchase hit was triggered. In the Data Layer tab, you can see the ecommerce data passed.